Oh, boy, this wasn’t easy. I’ve been trying for years to get my email life organized. The problem is this:
- I’ve got almost ten different email accounts
- I subscribe to tens of mailing lists
- I want mailing lists to be automatically moved to dedicated folders
- I want the same folder setup on different machines
- I want messages read on one machine to be marked read on all the others
- I used three different Macs to read mail on
- I want to be able to get at both inboxes and discussion list folders even through webmail
- I want all mail to be available offline as well
- I don’t want to depend on my web host to not lose my saved mail
- My regular inbox should only contain stuff I need to act on, everything else is either deleted or moved to a single (or possibly a few) archive folder
- That archive folder must automatically be available and updated on all my machines and webmail client
- Oh, I almost forgot: everything should be available on the iPhone as well, of course
Hey, that’s not too much to ask, is it? But until now, there was always something screwing it up. Now I think I’ve got it beat. Since I didn’t find all that much on the ‘net about this, but I did find little scraps here and there, I figured I ought to collect my notes here for posterity. Everything that follows was done on Snow Leopard, both client and server side.
Step 1 – Make it all IMAP
First things first. Change all your accounts in OSX Mail to IMAP. There’s no way to do this with POP3 access. I’m not going to describe how to do this, since it’s not rocket science and no secret tricks are involved. Take care so you don’t lose messages, though. (Not that I know why you should, but I felt I didn’t want to take responsibility if you found a way to screw up the only storage you had of those priceless emails.)
Step 2 – Get yourself an OSX Server
Not as bad as you might imagine. The Apple Mini OSX Server is pretty cheap. Set it up as safe as possible, using mirrored drives. If you have a NAS with RAID, you could set up iSCSI to that. I’m not going into this here either, it’s a separate subject, but I will assume you have an OSX Server at least. Most of what I’m telling you below can also be done on a webhost, but I didn’t want to have maybe gigabytes of mail storage entrusted to some cheapo webhost out there. But you decide, of course.
Step 3 – Enable webmail on your OSX Server
Since OSX Mail doesn’t seem to allow folder management under IMAP, that is, there is no way I can see that allows you to add new IMAP folders server-side, you need to do that using webmail. You only need it when adding or removing folders, not a daily thing.
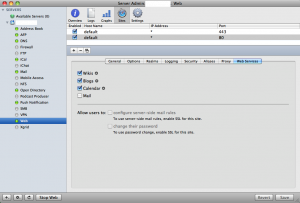
Assuming you have your user account on your OSX Server, that your DNS is set up right and that you can access your email account on the OSX server over IMAP, you now have to enable webmail on that server. That isn’t in the most obvious place, so I took a screenshot to help you find it (click image for full size):
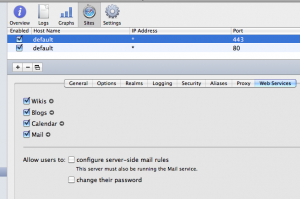
You have to check the “Mail” checkbox. Actually, I didn’t do that here, I selected the “default” on port 443 (upper pane) and checked it there, so that webmail is only available over HTTPS, not plain HTTP:
Step 4 – Create your folders
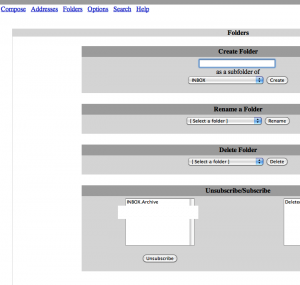
Via a browser, log in to your webmail account on the OSX Server. It does come with SquirrelMail already installed and running (if you did step 3 at least). Once in SquirrelMail, click the “Folders” link and you get the following screen:
The first field lets you create a folder. Leave the “as a subfolder of” set to “INBOX”, that’s a pretty good choice. It may not seem all that intuitive, but the OSX Mail client will not show these contents as part of the regular collection “Inbox” even though it’s a subfolder, so leave it set that way. As you create subfolders, you see them in the left listbox down below.
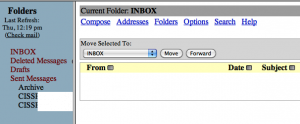
When you return to the main screen in SquirrelMail and refresh the folders (click “check mail”), you’ll see this:
…which doesn’t seem right. It looks as if your new folders are children under “Sent Messages”, but that’s just an interface bug in SquirrelMail. Don’t worry about it.
Step 5 – Back to OSX Mail
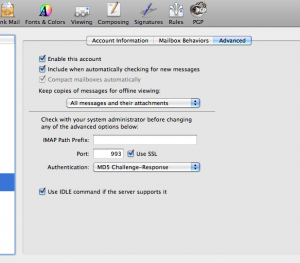
Just quit OSX Mail and restart it, it’ll find the new folders. Now, if it doesn’t, check the IMAP Path Prefix field, which you can find if you go to preferences, accounts, select the account, then go to the “Advanced” tab:
If it says “INBOX” in that field, just empty it and try saving, quitting and restarting OSX Mail. I’m not sure if it should or should not have the “INBOX” set there, but try either way if you have a problem.
Step 6 – Rules
Now comes the fun part. You can set up mail rules in the OSX Mail client that move messages into one of the new subfolders you created, even though the original mail came in on another mail account. Think about this for a while until it sinks in. The rules let you move messages from one IMAP server to another, not just between folders on the same server or you client machine.
So, I’ve got mail rules that sorts mail coming in on several different IMAP accounts. As they match different rules, these messages are effectively moved from the original IMAP server somewhere in the USA to my own IMAP server in the backroom, and all those sorted messages are now available in real time from all my Macs and my iPhone (and iPad once I have one). I do have public IPs, so my OSX server is available to me from anywhere, which helps, of course.
You can still easily see where the messages originated, since the “To:” field does not change when you move the messages. If you open a message in the common archive and click “Reply”, OSX Mail client will automatically select to reply from the account the message was originally sent to, not from the account that your archive is in. Exactly as I’d want it to.
Oh, wait, there’s more
I can easily add another IMAP account that is shared with coworkers, and move or copy messages there, manually or automatically, say for support or some mailinglist I want to share with them all. Think about that for a sec.
It becomes even neater if you have MobileMe and you have set mail accounts and mail rules to synch across your machines. I don’t even need to set up the rules as they change. I change them on any one of the machines, and the other machines update the rules. I may, occasionally, have to enable the rules (I don’t know why), but their content is updated.
This is so cool.
Update: You can actually create the IMAP folders just as easily from inside OSX Mail. Just go to the right IMAP account in the side panel, then click the “+” down on the left, select “New Mailbox” and if you scroll far enough, you’ll find your IMAP accounts if one is not already selected. Select one of those and you can create a folder on the IMAP server. It was too obvious for me, I guess.

