
About two and a half years ago, I wrote a post about fixing the “click of death” problem the Razer Mako 2.1 THX speaker system is prone to. My Mako worked fine until recently when it failed in another way, namely with no sound at all anymore. No clicks, nothing. While the “control puck” still kinda worked, it flickered and behaved weirdly.
I tried getting Razer support to give me schematics, but no go. Also, I can’t find any schematics on the net either. I did figure out by looking at the board that it is a dual switched power supply (two bucket converters), which implies that there are dangerous voltages on the board. Not only that, but you can’t safely ground anything on such a board, so that connecting a mains powered oscilloscope will typically result in your ground fault breaker to trip (if you’re lucky) or your oscilloscope to short out and die (if you’re less lucky), or you yourself to short out and die (I know, not funny).
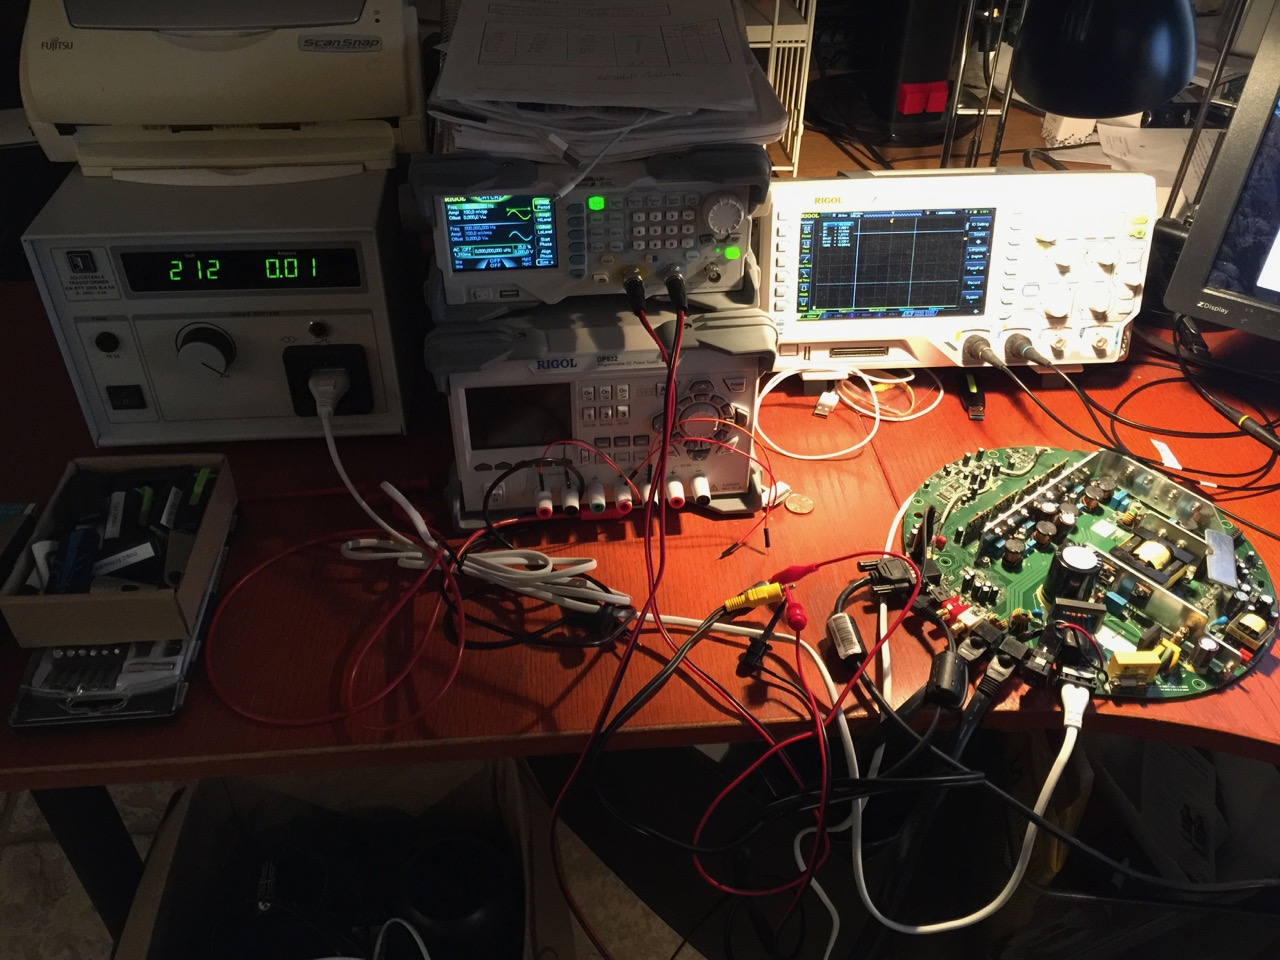
To be able to work on a device like this with a scope or signal generator (anything that needs instrument ground to connect to the device under test), you must, absolutely must, power the device through an isolation transformer1. But even then you need to be very careful, since even though you eliminate the ground loop problem, you can still electrocute yourself just fine by grabbing onto the less advisable parts of the device. So unless you really, really know what you’re doing, and you use an isolation transformer, I’d suggest you never work on the Mako with power connected2.
I’d suggest, if you don’t have all the gear I’m using, to simply unplug the Mako, let it rest a while, open it up, then replace the capacitor I’m mentioning below, then put it all together and test it. For disassembly, see my earlier post about the click of death.
I worked on the Mako for more than a week, an hour here and there, while thinking it through. I did conclude, and confirm, that all the power supply voltages on the board were only present if all speakers and the control puck were connected. Logical, when you think of it. (Again, only touch this thing if it’s on an isolation transformer, and even then with utmost care!)
I then fed the inputs with a sinus signal of 500 mV and a few hundred Hz and found it was present on the ADC0 or ADC1 inputs of the ADAU1701 chip (depending on if I connected to left or right channel input), so the preamps worked. But checking on the VOUT0 through VOUT3 outputs of the ADAU1701, I found nothing but a high frequency noise signal just under 60 kHz. Touching some of these outputs made the speakers click, so the power amps were probably also ok.
I then checked the power going into that chip and it looked awful, around 3.3 V but with a 60 kHz signal overlay of more than 200 mV. A horrible ripple, in other words.
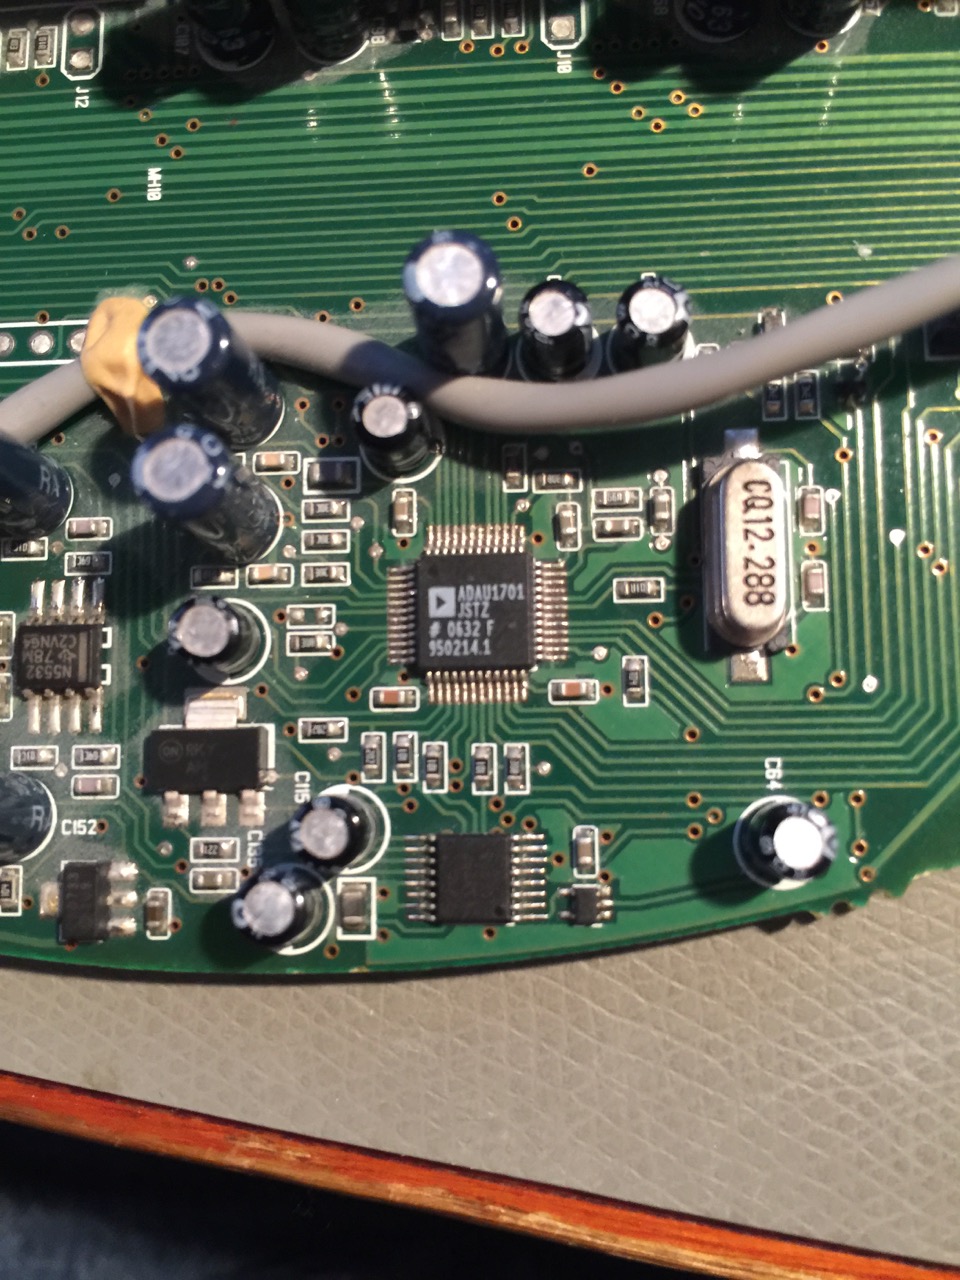
That, to me, meant that a large smoothing capacitor must have failed. The huge ripple on the power line must have severely screwed up the workings of the ADAU1701, which is a ADC/DAC signal processor and which does practically everything that needs to be done to the audio before going to the power amplifier stage. No wonder I had no sound.
Back to capacitors, then. I could not see any bulging capacitors, but feeling around I found one that was so hot it almost burned my fingers. And that is really not normal. If this cap was shorting out3, it would explain everything, and sure enough, after replacing it, the system now works normally. The bad capacitor was labeled C122 on the board, a 330 µF/25V, which I replaced with a 470 µF/35V, simply because I had no 330 µF at 25V or more. Seems to do the trick, though.
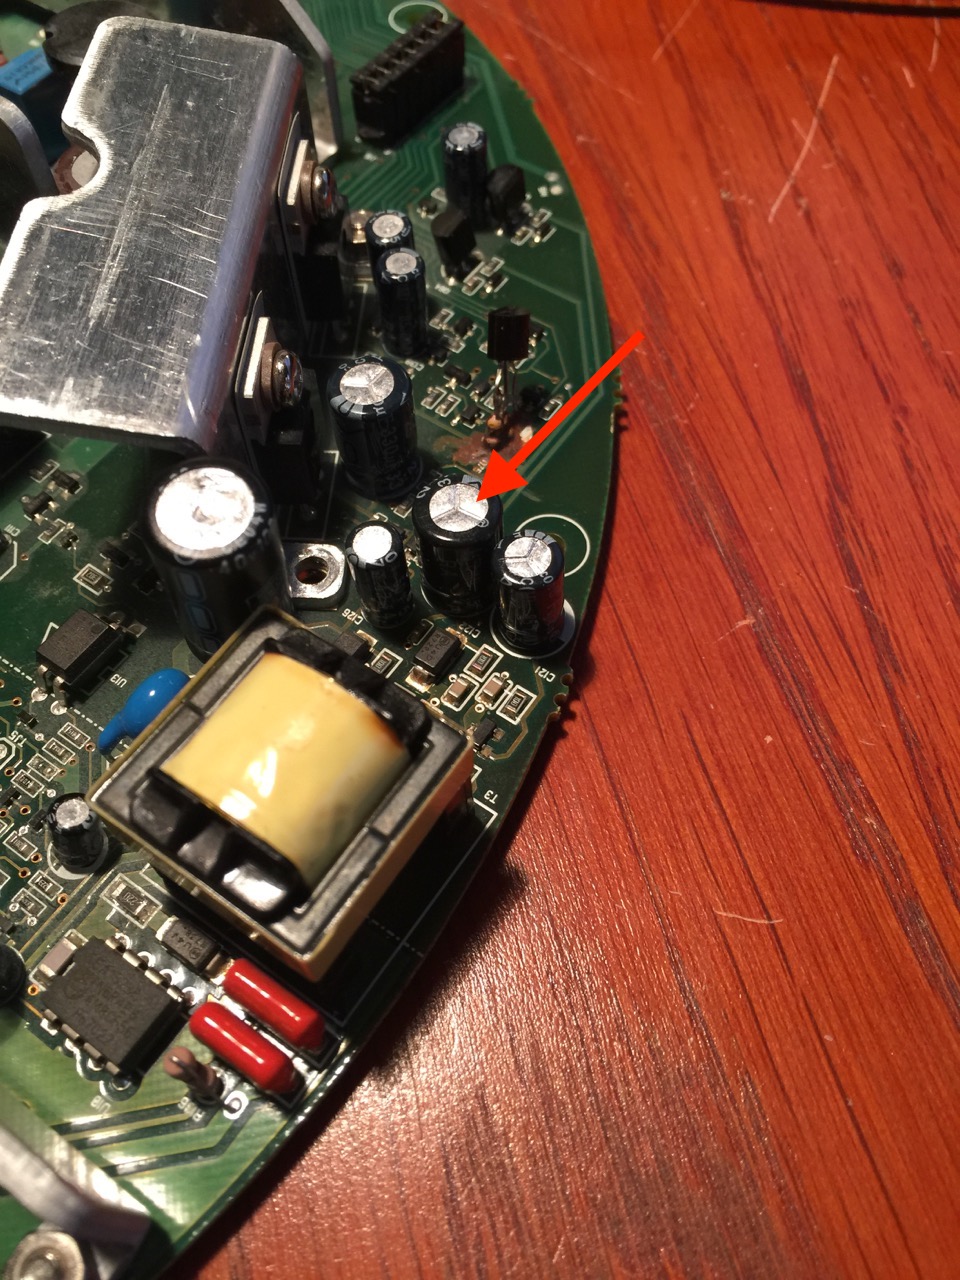
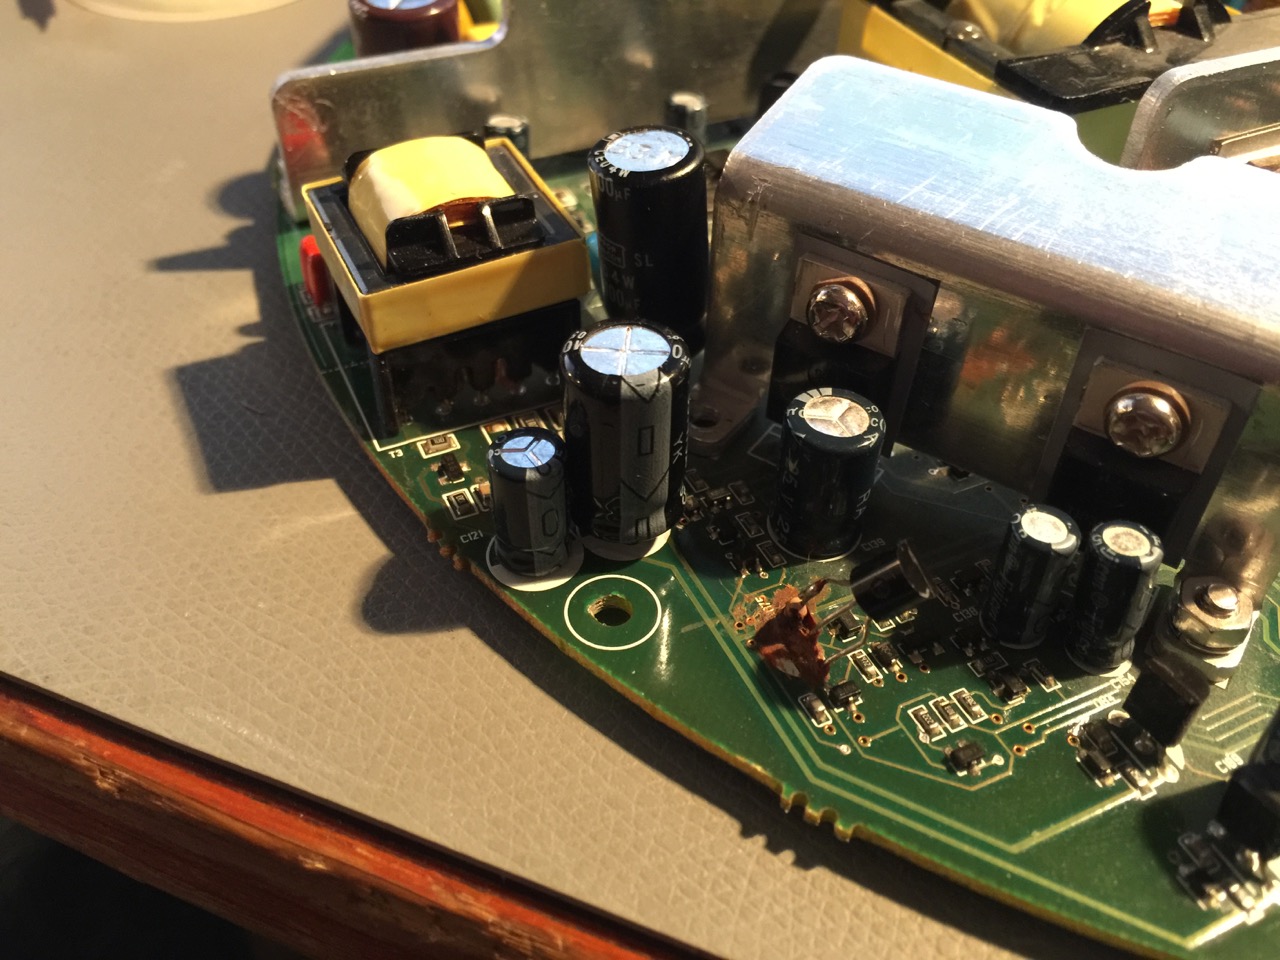
(In the foreground of that last picture, you’ll see a transistor with a horrible mess around the legs. That’s normal! Razer put in a series resistor there as some last minute change, then added some gunk that turns brown. Looks like shit, but I couldn’t find any fault there.)
Moral of the story: if you have a Mako with no clicks, no sound, and a semi-working control puck, try replacing this capacitor. There is a decent chance it will work.
Update 2018-11-21: Ohan Smit kindly contributed a list of all electrolytic capacitors in the Mako, very handy if you want to replace them all. Since it’s well neigh impossible to make a readable table in the comments, I added this table here.
Capacitors
| Volts | Capacitance (µF) | Quantity |
|---|---|---|
| 10 | 470 | 2 |
| 25 | 47 | 4 |
| 25 | 330 | 4 |
| 25 | 100 | 1 |
| 25 | 10 | 8 |
| 50 | 4.7 | 22 |
| 50 | 2.2 | 1 |
| 63 | 10 | 6 |
| 160 | 47 | 4 |
| 400 | 22 | 1 |
- You can also use a “differential probe” which is better at protecting your oscilloscope than an isolation transformer. But the isolation transformer is better at protecting you from electrocution, but only if you know what you’re doing. The isolation transformer, for instance, makes it less likely that your ground fault breaker will trip, so it’s a mixed blessing.
- Also, there are some big capacitors that may retain charge quite some time after unplugging, so give the device time to discharge before you touch it.
- It wasn’t “shorting out”; it was degrading with an increased internal resistance (ESR), which is almost the opposite. See my next post.
I have replaced both capacitors now and still no luck with powering up my system. Controll pod does not light up, but there is power all over the mother board? Really frustrating!
There are several different power systems in the Mako, I think three. You could check if the ADAU1701 gets power. Check pins AVDD and DVDD (for pinout, see datasheet at: http://www.analog.com/media/en/technical-documentation/data-sheets/ADAU1701.pdf). It’s very fiddly; the pins are tiny. And, be careful where you rest your hands! Don’t touch the heat sinks, some are high voltage. Now, even if you find reasonable voltages, it doesn’t mean the supply is ok (in my case it was the right level on a multimeter, but incredibly ugly on the oscilloscope).
Most likely fault is still some electrolyte capacitor somewhere since Razer went for cheap junk, but there are quite a few to choose from. Best would be if you could find an ESR meter and check out the caps without removing them from the board (while the board is powered off). Sadly, I can’t say where you’d find one, seems not to be easy to find.
What you also could do is to let the system run for 10-15 minutes, unplug it, and then feel around if you find any capacitors that are warm to touch. Only feel the plastic housing of the caps since some of the bigger ones hold a serious charge for a while. Don’t touch them while plugged in to power, since some are at live voltage levels.
Normal capacitors should never heat up. Now, if a capacitor got so bad it shorted out, it won’t get warm anymore, but then they’re usually visibly bulging or leaking instead.
Thanks for the feedback.
The transistor with the brown gunk can you tell me what resistor it uses based on your technical background. Because of the brown gunk I can’t tell the colour rings nor what wattage it is. I know the transistor is 2n 4401 I’ve noticed somehow it broke off so I also need to replace it along with the one you replaced in above post.
No, I’m sorry. And now the system is all closed up. Can’t you measure it? The wattage is almost certainly 1/8W, judging from size.
Damnit. I had this mako 2.1 for like 7 years now. Few years ago I also had the click of death, but by the grace of your blogpost got a electrician friend to come fix some new capacitors. alas i moved from Copenhagen to Vienna and now I have gotten this flickering+no-audio issue as well and fear it is the end of life for my dear speakers 🙁
They have served me so well for so many years *sniff*.
I dig also their new speaker lineup razer nommo (pro). But seeing as they used so crappy capacitors etc. for the 2.1 and the lack of support after they went out of production (not sharing the printboard layout etc.) I’m doubting if I should go razer again :\
This 2.1 had just so great sound for what it was and costed. PERFECT for desktop really, with the downward firing satelite speakers. Don’t know why they did not make an updated version of this fantastic 2.1 system.
I have flickering sound and clicks as well, started in 2019.
Replaced the 47uf 25v capacitor but no luck. Any suggestions? I also ordered Nichicon 4.7 50v, they are in transit tho.
Symptoms: sometimes no sound. Suddenly sound starts with flickering.
I love these speakers so trying everything i can.
Should i replace all 47uf 50v capacitors all well?
Snehal,
I really don’t know. It could be worth a try. You could replace all the capacitors (see the list in the post) and it may solve the problem. But I can’t guarantee it, of course.
Best would be if you connected the speakers and the puck and left the system running (without touching it!) for a while, say half an hour, then disconnected it from power and carefully felt if any capacitor was warmer than the rest. Only touch the top or sides of capacitors though, since they may hold charge for a while. If one is hotter, it’s probably the culprit. To test, you really have to have everything connected, else large parts of the board aren’t even powered up. The system doesn’t even turn on the amplifiers and large parts of the power system if the speakers aren’t connected.
Another way would be to use an ESR tester, if you know any electronics people that have one. The third option is to replace all the capacitors, but there’s a chance it’s not going to solve the problem. A lot of other things may break in the system; it doesn’t have to be a capacitor.
Sure Martin, thank you for the update. Ill check with technician locally if he can fix. May be i did solder blunder as i did it for the first time. But i can confirm polarity was fine. Matched it before removing as well. Negative mounted on white end on the board. Those were nichicon 47uf 25v capacitors. Ill update you the progress. 🙂 thank you so much for the heads up.
Yes, negative mounted on white color on the board.
Well, then I don’t know how to proceed from here, sorry.
Snehal,
I just noticed you said “47 µF” capacitor, but the capacitor I replaced in this post is a 330 µF (C122). So either you replaced some other capacitor, or you replaced it with a way too small capacitor, or maybe you mistyped?
Yes i have ordered 330uf as well. I replaced c125 the 47uf 25v. Still issue persists.
Then i replaced c51 and c65 with 47uf 25v and now my control pod is not turning on. Lol not sure what i did wrong. After replacing i just saw blue light once for a sec and it never came back.
Are you sure you installed the new capacitors with the right polarity?
Dude!!!!!
Thanks for your continued motivation towards out Mako sets 😀
Replacing C122 fixed the system 😀
I did however buy for approximately 9usd a whole replacement set of capacitors, 53 in total.
Have a super weekend and know your curiosity made music play in Cape Town today!
Cheers
I have too also note, the capacitor was hot to the touch prior to me replacing it.
Took my IR temp gun and it was at a crispy 56 degrees Celcius, enough to give me a tingle.
Ps. Would replacing the dead short next to the main 400V 330µF with another 400V 330µF break or improve such a power system? I ask since my set has this strange scratching sound if it is powered on, ever since day one.
Thanks 🙂
Cool that it worked!
No, I don’t think replacing the short with a capacitor is a good idea. I don’t think it will work at all. It could just as well be that it’s used in an alternate configuration where other components need to be removed. If I were you, I wouldn’t try it.
Thanks that makes sense.
Thanks for this great advice Martin! Fixed my speakers all working again after replacing the a 330 µF/25V and the one of the same value next to it, speakers like new . With my Mako speakers fault I eventually had no sound except for a roaring waterfall and garbled noises, so delighted that something as cheap as a capacitor did the trick! I followed your original post on fixing the clicking sounds which worked for a while but after a year or so the speakers got gradually worse. Now there right back to their best again clear as bell! Thanks again, Mark
Hello Martin,
I am thankful you found out the culprit since my mako speaker set just went silent. However, I am a bit paranoid now that the capacitors may all go bad. If I wanted to change them all (including c122, not 125 since I already had to change that) would you recommend audio grade caps? Or perhaps caps that are specially used for power supplies? Or any general caps as long as it’s not fujicon? And if so please give me a site/company you preferentially order from!
Jeff,
Well known good brands are Nichicon and Panasonic. But you need to buy from a reputable source, else they can be fake (i.e. avoid eBay). Farnell.com and mouser.com are reliable. And no, I don’t think you need “audio caps”, just regular good quality electrolytics. Do take care that the voltage rating is as high as the original or a bit higher.
There are more brands and sources, but that’s what I can think of right now.
does anyone have a list of all of the cap values so I can make an order to replace all of them. I fixed the clicking back in the day but it is dead again with no obvious bulging so I am going to do the lot
Id did this some time ago 🙂
Volts Capacitance(uF) Qty
10 470 2
25 47 1
25 330 4
25 100 1
25 47 2
25 10 8
25 47 1
50 4,7 2
50 2,2 1
50 4,7 20
63 10 6
160 47 4
400 22 1
Ohan,
Thanks for the list. I reformatted it as a table and added to the post itself. Easier to read that way.
thank you so much for this
just an observation you have 2 entries for 50v at 4.7 uF one with 20 caps the other with 2 I assume one of them is meant to be 50v 47uF ?
Hi
I’d have to double check, that does seem odd.
Will do so tonight when I get home.
Kind Regards
I see now that there are three entries for 25V 47µF as well. 1+2+1.
Hi
Right so the reason there are some double entries are that I just wrote it as I went across the in my notebook, and when I made the list on excel I never thought of properly grouping them together.
25V 47µF there are 4.
50V 4.7µF there are 22.
Sorry for the confusion, I did this some time late at night in April of this year…
Kind Regards
Ok, changed the table with the corrections now.
well I have brought these speakers back to life again ( I originally had the clicking death symptoms first time around ) and replaced one cap to bring it back to life. This time the same on as in the article plus the ones on either side just to make sure as they were a little hot as well. My favorite speakers live again after a year in the loft
Hello
10k plus question. Where can I find a spare control pod for Razor Mako? On ebay nothing shows up.
hey martin,
3 years ago I had the “click of death” issue, used your fix and it worked like a charm up until 3 days ago, now I can’t even turn them on and I don’t even know if following this “no click of death” fix will fix it.
I would suspect that it is just another Capacitor that has had it, mine didn’t bulge but it stopped the whole thing from working. I worked out which cap had blown by using an IR thermometer to find the hot one/ones. I then replaced it/them and I heard the alert for this comment on the very same fully operational speakers.
I got mako. Totally dead. Cant find voltage rail. Anyone know how many power supply on jumper connector in razer mako. I have Changed all the capacitors but no changes.
Which jumper are you referring to?
Hello Martin.
I have this shark hanging without sound and the remote control works for half. I have Changed all the capacitors but no changes.. What are the voltages on the jumpers.
Especially intirits three bottom from the edge of the board.
Serg,
I have to admit I don’t understand your question. Can you reformulate and be more precise?
Big Thx.
Works great again
I brought another set of Mako 😀 my 2008 set died on me. just wanted to check where can I get those ethernet cables? these are are not ordinary LAN cabled used in PC’s. Anyone has any idea?
I also contacted Razer support, no reply from them.
I don’t know if regular network cables have the same pinout, but they could work if they do. Maybe try carefully on a low volume?
Edit: I just checked one of the black Mako cables with an ethernet cable tester, and they do indeed have exactly the same pinout, so a regular ethernet cable should work. Maybe it would give some distortion on high volumes, but otherwise it ought to be fine.
Is this the same cable? I do not have have much knowledge so just asking. I did try my ethernet cables couple of years back. They didn’t work.
This, Not sure if they will work, bit expensive tho.
https://rover.ebay.com/rover/0/0/0?mpre=https%3A%2F%2Fwww.ebay.com%2Fulk%2Fitm%2F193241806246
I just tried using a regular ethernet cable and it didn’t work. The middle blue light on the puck just kept blinking. So the Mako does somehow detect it’s not the right cable and refuses to work.
Electrically, I don’t see the difference between the cables, so I don’t know how to solve this. Sorry.
And I have no idea if the cable you’re linking to is any better, but I doubt it.
Okies, thank you for the update. Ive contacted Raze support, lets see if they respond. I was just looking for small cables because the existing ones are too lengthy.
Razer has 10 wires crimped, while ethernet has 8 wires.
You’re right. I totally missed that.
Hi Martin..it would be highly appreciated if you could provide an schematic diagram for razer mako control pod.or even just a control pod plug pinouts.I have this speaker for 3 years now dead and I want to keep it alive..thanks a lot!
I’d love to help, but I can’t. Razor wouldn’t give me any schematics and I couldn’t find any on the net either. What would you do with the control pod pinouts, by the way? If you’re planning on building a replacement for the pod, I think that would be truly hard. I think (I’m guessing here) that there is a processor in the control pod and that the pod has data lines to and from the main unit. So you’d need that processor and the programming of it, not just a few potentiometers and switches.
My control pod plug got burnt and can’t figure out the pinouts. I wanted to replace with VGA cable plug as it has the same number of pins.
Rowell,
I see. Well, if you peel off the outer sheath of the cable close to the connector, can you see if the wires all have different colors? If so, maybe just cut it and then measure which wire goes to which pin with a multimeter?
I fixed recently a Razer Mako Control pod cable… bought new 16 core wire, D-SUB (DE-15) VGA connector, measured, found out and soldered the right cables into the connector and it is working…
Hi I was having problems with my mako and found this post, hopefully its still alive. I previous had the clicking problem and replaced the C125 based on this forum. Now I have a new problem, for the last few weeks when I turned on my mako, there was a short pop sound followed by now sound, I had to restart my mako a few times for the sound to come on. Now when I turn them on, the light on the control pad keeps flickering and theres is no sound at all anymore. There is a pop sound if i turn off the main power supply and turn it back on that’s about it.
Which capacitors should I replace?
Parth,
Start with the C122 that I replaced in this post. If that doesn’t work, do the thing where you connect up everything, speakers, control pod, and power up the speakers for half an hour, then unplug everything, including power(!), then feel around if you find a warm electrolyte.
if its warm i replace that one?
Yes. A normally functioning electrolyte should not be warm.
by the way, are these correct ?
C125 47uF 25V
C122 330µF 25V
C121 100uF 25V
C126 4.7uF 50V
C139 330uF 25V
C138 4.7uF 50V
I don’t know. I never made a list of capacitors by position on the board. There is a list of capacitors, but without positions, in the post above. The one Ohan Smit made.
https://www.dropbox.com/sh/cvlnyj5cmkdr8yl/AABPDdWChUXHSuD-W3bzvvixa any idea if these are correct?
I’ve never seen those pictures and lists before. Where did you find them? I don’t know if they’re correct, but it’s not difficult to read off the capacitor values from the capacitors themselves when the unit is open.
i saw his, but theres no position number yeah ? I think i found it here https://forums.whirlpool.net.au/archive/1739055
by the way, these are almost exactly all the capacitors i need to replace, all of them we hot – warmish
https://www.dropbox.com/sh/cvlnyj5cmkdr8yl/AABPDdWChUXHSuD-W3bzvvixa?preview=Mako.jpg
If they’re really warm, they’re probably defective. Though I must say it would be unlikely to have more than one or two fail at the same time. When we say “warm” we mean much warmer than the rest, often hot enough to be almost painful to grab.
i guess i singled out c121 c 122 c125 and c126 to be the warmest ill start with them first.
by the way, any recommendations for a brand? https://sg.element14.com/w/c/passive-components/capacitors/prl/results?capacitance=47uf&voltage-rating=25v&st=47%20uf
and do you have any idea what is the difference between all of these ?
https://sg.element14.com/w/c/passive-components/capacitors/prl/results?brand=rubycon&capacitance=330uf&voltage-rating=25v
Parth,
Good brands are Rubicon, Panasonic, Nichicon, off the top of my head.
The electrolytes in your link have different connections. You should use
axialradial, but if they’re 8 or 10 mm doesn’t make much difference.Also, if the original was 25V, try getting a 35V instead, so it’s less likely to fail again. They’re slightly larger, but there’s space enough on the Razer board. I think Razer simply didn’t provide enough margin by voltage, which is why these failed.
alright thanks for the advice, will let u know how it goes
by the way theres 25 and 50 V’s in my list, can I go higher? like 50v for for 25v and 100v for the 50 vs or something like that? or is that too much
No, that’s ok. The higher the voltage, the more margin you have, within reason. But the higher the voltage, the larger the capacitor, so you’ll run out of space at a certain point.
okay so im happy to report, that my speakers work (i had the no sound + the blue LED on my control pad kept flickering when I turned it on), I had to replace C121, C122, C125 and C126, have replaced them with 100uF 35v, 330uF 35v, 47uF 50v and 4.7uF 63v.
thanks for all your help martin, i wouldnt have figured out which ones were faulty without your help. I didnt do it myself though I asked a pro to do it, i had to pay 40 dollars but it was worth it since i didnt wanna make any mistakes.
He checked the capacitors for me and 3 of them were dead and the last one was close to dead.
Parth,
Great news! Thanks for letting me know.
With four bad capacitors, I think you must have hit a record high.
Parth,
I miswrote a few comments ago. You need “radial” parts, not “axial” as I wrote. I’ve changed my comment since then.
i want to try to replace the other capacitors as well, is there a video or instructions on how to do it, something very similar to whats in the mako? is it called a 2 layer pcb?
Parth,
I think you need to learn basic soldering. There are heaps of videos on youtube if you search for that. There’s also a beginners forum on eevblog:
https://www.eevblog.com/forum/beginners/
…where you can learn a lot of things about electronics and ask questions.
thanks for all the info, will check it out
THANK YOU!!!!
popping issue and followed your guide. At first it wouldnt turn on… I didnt solder the pins well enough. Once I did issue resolved!
Its 2020 and your post is still saving mako systems. I hope you keep your website alive for others!
Hi martin, recently my mako decided to fail again and has been making sparking noises in the subwoofer, the system also sporadically restarts. So I opened it up and found the arcing was occuring between this resistor (not sure if that’s what it is, but it’s that SMD chip) and the 400V 22uF capacitor next to it.
https://i.imgur.com/Sn1ApBL.jpg
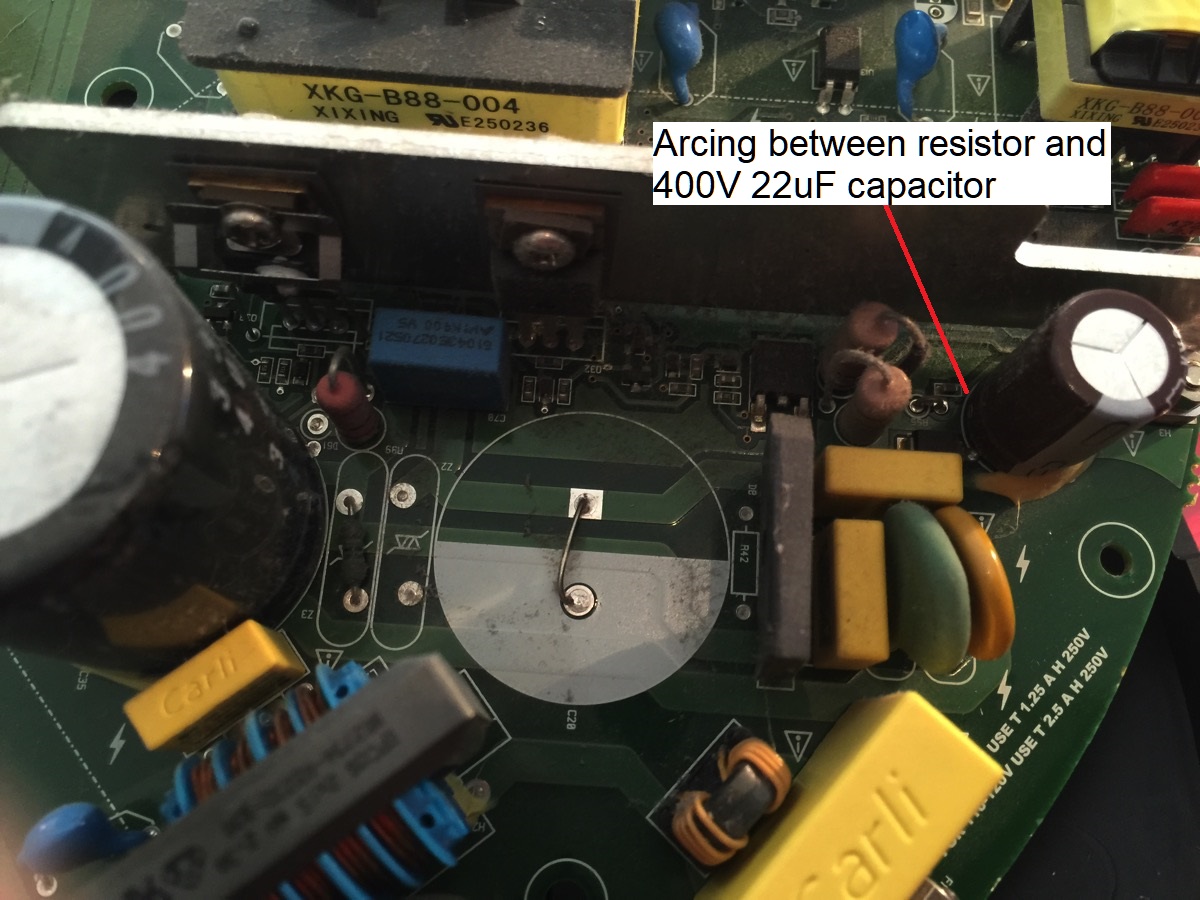
Do you have an idea what might be the cause of the problem? I’m not sure if it’s the capacitor failing or the resistor becoming loose, but the right terminal of the resistor did look burnt and had some carbon soot. The capacitor top looked flat and didn’t looked like it was leaking or failing, so I am not sure if it is the cause of the arcing and the system restarting. I was wondering if resoldering the resistor would fix the problem (didn’t do that because I wasn’t sure and it’s kind of hard to reach in with a soldering iron without removing the capacitor too, and don’t have the glue used to secure the capacitor on hand). Thanks!
John,
(I took the liberty to copy your image to the blog and inserted it into your comment. That way it remains available if the imgur link goes away. I hope you don’t mind.)
I don’t think the arcing is due to a bad resistor or capacitor. It must be due to dirt of some kind between them conducting the electricity. So what I would do is remove the capacitor and clean the area between them with a damp cloth, and isopropyl if you have some, then put the capacitor back. While you have the capacitor out, check if it’s leaking something through the bottom, since that could also explain it. In that case, you need a new one, of course.
I don’t think you need to remove the SMD resistor (if that’s what it is, but I think it is). Also, don’t worry too much about the snot (that’s what people often call this glue…). As long as you don’t shake or knock the unit around too hard, the snot isn’t really necessary.
If you don’t see anything wrong with the capacitor or no significant dirt on the board, you could check if the resistor has come undone and is sparking against the board. With the capacitor out of the way, it should be easier to see and possibly reheat.
Good luck and keep us updated!
Hi martin,
I removed the capacitor for now. At first glance it didn’t look like it leaked but I did find some minute amounts of green oxidized material when I wiped the bottom of it clean of the gunk, which is probably leaked electrolyte. Board itself looks clean though.
https://imgur.com/a/vq9i242
Sorry for the poor resolution, was the best I could capture with a phone camera zoomed in.
The resistor itself doesn’t look as good though, it looks like the metal contacts have burnt off or still covered in soot. This was after I tried scraping away as much of the carbon leftovers from the arcing as possible, so probably the former. The metal pad itself also looks like it has oxidized with its copper color. The shorted lead next to it also looked loose as the hole wasn’t soldered up completely and there was a gap, but don’t think it’s a problem since the arcing didn’t happen there.
I’m not sure if I can just solder some lead onto that “damaged” resistor terminal and pray that it would work, or I would need a new resistor. Also unsure of how to clean the metal pad of oxidation without damaging the PCB. Meanwhile, I will be ordering a replacement 400V capacitor, figured I might as well change it now that I removed it. Will update again when they arrive. Thanks for your help and guidance!
John,
Well, that looks bad, but should be fixable. I think what you first need to do before heating the resistor is to try and measure it, so you know its resistance value. You may need to replace it.
I think, from the picture, though I can’t be sure, that the jumper wire only leads to the resistor and nothing else. If so, maybe you can replace both by a single resistor with leads instead. If, at least, you know which resistor you need. If you can’t measure the one you have, I could take mine apart to check.
Or, can you make out any numbers on that resistor? It’s usually three digits, something like “103” or so.
Hi martin,
I re-soldered the resistor back and installed the new capacitor. The system turns on and plays fine now, though I did a poor job of the soldering. The resistor was too small for me to apply a teeny bit of solder with my cheap soldering iron, so now the globule of solder is touching the capacitor. It might still be shorting across the solder but I have no idea, at least there isn’t an obvious spark to tell. Crossing my fingers that it doesn’t burn my house down. Thanks for your help once again!
John,
Good job! I copied in your new images too, to preserve them against link-rot.
I can definitely say that after following your instructions for the second time… My Mako Razer speakers are back to life!!! I have no words to express myself how happy I am! For the “click of death” one I’ve used a better capacitor, (47uf at 25V) something made in Germany, I’ve paid about $5 for 2 pcs.
For the other one described above (330uf 25v) I went with a generic one, whatever I found at the local shop since to this Covid-19 makes shipping around the globe alot harder… Anyway, this method fixed my speakers! I’ve bought them broken (click of death) for $30, I purchased the capacitor ($5 for 2 pcs) fixed myself and for the last 3 years this was my best companion while around my PC editing pictures… I’ve never turn them off, I am not a fan of the touch remote, so I like to keep it on all the time, volume around 80% on the very first red lines… And use the volume in the PC for adjustment.
I used a Dremel to cut out the capacitor, than I soldered a new one onto the old connector legs since the “click of death” capacitor failed again so I’ve learned my lesson, looks ugly but if I need to replace it again I will only need to use a pliers and cut it off, solder again on the same connector, easier and less risky of ruining the PCB.
The simpsons for this were a flikering remote lights with no sound at all after at first I’ve heard a weird static noise going louder and louder until it just simply died!
I can only wish all the best to the person who took the time and wrote this article so handy people would fix their things as well.
I’ve myself found a issue with a washing machine and took a video about how to fix it, it’s a very common problem that the manufacturer never cared about it since my fix is something related to cable management… Everytime I get a comment from someone who fixed his washer I get a happy feeling, so I am taking the time to write this at 2 am as most of the people would fix their things and never bothering to say a few words as appreciation for the person who did the real effort!
My speakers are now resurrected to life just only to you, hat off to you sir, greetings from Vancouver, British Columbia, Canada. Cheers!
Daniel,
Thank you for the kind words! And yes, it does indeed make me very happy to hear back when things work out.
Hi Martin, please help! Unfortunately, I am back here… after a week of being back to life… my Razer Mako speakers died again 🙁
This time I get the remote pod logo blinking, for about 1 minute or less, it blinks slowly, I would say every second or so… then it stops blinking and all the other lights are going off and the remote pod logo is not blinking anymore, stays solid but dimmed, pretty much like when the speakers are in stand by, just waiting to be powered up… no sound at all!
Any help, please? Daniel
Hi Martin, it turned out it was the same capacitor that I just change it a week before… luckily, the job was a lot easier since I left very long legs to the previous capacitor and I only had to cut them off and solder a new one to the old`s one legs. I think it went out because I have the bad habit to not turn off the speakers at all, they stay on for months, at night I just turn off the PC and that’s about it…
The blinking that I mentioned in my previous comment… damn… shame on me, one of the speakers I forgot to plug the wire and I got thrown off by it.
Anyway, my EVER best speaker system is back to life! I have no words to describe how happy I am. These speakers are absolutely amazing in sound and quality, too bad they are not that reliable but that`s why we are all here for! Greeting from Vancouver, Canada!
That’s good news. If it happens again, try to get a capacitor with a higher voltage rating, which would give it more margin. I think Razer underestimated the necessary rating a bit.
By the way, you should be able to leave the speakers on all the time. That shouldn’t destroy the capacitors, if the capacitors are any good.
Hi, i posted earlier this year about fixing my razer mako.
Today i have a problem i didnt have before.
I heard a really loud high pitch crack and now there is no power coming to my mako. it completely died. any ideas on how to fix this?
Parth,
No, I can’t say what your new problem is, but if there is no power at all, it should be fairly easy to find the fault for someone with a multimeter, starting from the 220V input. Again, not with the power connected!
Hey I believe it’s the fuse. Any idea if it should be a slow blow or fast blow fuse if I want to replace it?
By the way with a multimeter, don’t the capacitors need to be removed individually ?
I have a multimeter I’m just now sure what to do
I changed the fuse but it blew up again, I think there’s a short somewhere but I don’t know how to find it
First of all, inspect the board carefully. If there is a short somewhere, you can often see it as a bulging capacitor, or burn marks on resistors or the board itself. It’s probably close to where the power comes in to the system.
If you see nothing like that, you probably need to find someone who knows electronics and can go through it systematically for you.
Yeah I tried eyeballing it, couldn’t find anything like that sadly
Parth,
Did you ever get your mako working again?
Yes I did, mine works even today! I am actually listen to it while typing this text. It has to be something with the capacitors. You should check on c121, c122, c125 and c126.
If mine will ever die for good, I’ll resurrect it with a aftermarket amp, I’ll look for a decent one in the range of $100 and fit it in the sub, most likely I`ll get rid of the puck, as I am not a fan of it anyway…
Hi! I’ve followed this post for years now. I tried to fix my mako without success and now I’m done with it.
Martin, from the depths of your knowledge, can you tell me if I can bypass all the circuits and use the speakers to build/connect them to an amplifier ? I really would like to re-use them, it seems a waste of good audio speakers not to.
I would like to remove the circuits and keep the case of all speakers but I really have no clue where to begin, thank you!
Nicholas,
I’ve never taken the small satellite speakers apart, but I’m pretty sure that if you do, you’ll find pretty much standard speakers in there connected to some electronics. And those speakers can be connected to any normal kind of audio amplifier. As can the big woofer in the main box.
One complication is that most amplifiers have two channels which expect bass (woofer) and treble (tweeters) on both channels, while the Mako is based on a 2.1 system, that is 2 tweeter channels and 1 woofer channel. So you either need suitable crossover filters (which I don’t know enough about to advice) or find an audio amplifier based on 2.1 outputs, that is 2 tweeter outputs plus a base/woofer output.
Another theoretical problem could be the impedance of the speakers which need to match the amplifier, but it’s highly likely they’ll both be 4 or 8 ohms, and that’s ok even if one is 4 and the other 8 unless you really crank it up.
Oh, I should add that you are not guaranteed that they’ll sound as good connected to a regular amplifier. It’s very likely Razer adjusted the output signal in their amplifier to match the speakers, in order to get the best sound. Another amplifier won’t do that. I don’t know this for a fact, I’m just speculating here.
Thank you very much, I have enough information to begin my research!
I actually did it! I have directly connected all three speakers to this amplifier this https://images-na.ssl-images-amazon.com/images/I/71gni%2BP37rL._AC_SL1500_.jpg and everything works perfectly!
Hi, that’s just great to hear it, what amplifier it’s that one? I am definitely looking forward for it when my Mako speakers are gone forever. I am also never been a fan of the remote pod.
How do they sound comparing with the Mako’s amplifier?
It’s a simple digital 2.1 amplifier, here’s the link to the italian amazon https://www.amazon.it/gp/product/B08FDKRZM2/ref=ppx_yo_dt_b_asin_title_o02_s01?ie=UTF8&psc=1, you should be able to find it elsewhere.
I can’t actually say if it sound better or not because my mako has been off for a loooong time, but for what I can hear now, it sound good for my standards.
I ditched the pod and all circuits, I just took the speakers cables and added some new OFC (oxygen-free copper) wires to them.
Thanks, I’ve found it on AliExpress for really cheap, if you don’t mind the shipping time, it’s a great deal.
Thanks for for sharing the outcome with us.
I’m including the image Nicholas linked to here, so it’s still viewable in the future.
Hi Nicholas, can you give us some detail on how you set up the 2.1 system with this digital amp? Thanks!
Wow, almost 2022!
I can barely remember what I’ve done, but it should be no more and no less wiring cables DIRECTLY to all speakers independently and the connecting them to the amplifier depicted, no other components were involved.
So just use the speakers as passive ones.
Haha yes I’m still clinging onto my Makos in 2021/22 and hoping for a fix. I just feel that they are the best sounding speakers. I have a set of Harmon Kardon Soundsticks too but I much prefer the Mako. The first time they broke I spent around $200 to have them fixed but I’m really intrigued by the idea of just hooking them up to an external amp as you’ve done.
Pardon my ignorance but how did you connect the wires to the amp? The satellite speakers have those weird ethernet-style cables. Did you just strip the wire?
Yes, I literally ripped almost everything from the speakers. I trashed the motherboard from the sub and all the ethernet connections from the satellites (but I first tried to use them and the original cables without luck) so only the speakers and the outer case remained.
The new cables are a bit loose because they pass through the old ethernet jack space, but they can be easily fixed in place with some glue or silicon.
I soldered the cables directly to the speakers pins 🙂
NEW audio cables, just like these:
https://www.amazon.it/gp/product/B01D01FDKC/ref=ppx_yo_dt_b_search_asin_title?ie=UTF8&psc=1
Hey Nicholas,
In the same boat as you trying to hook up to this amplifier. How did you hookup the tweeters to the amp? did you use a crossover or did you wire teh mid speaker/tweeters directly to the amp?
Thanks in advance!
Hey Jay I’m sorry but I really don’t remember, I think I just wired everything to the amp. I remember reading about crossovers but It wasn’t worth my time to actually craft/fiddling with one.
Anyway I don’t have an particular issues with my current amp even with higher volumes, just try to carefully balance the treble and bass so every speaker behaves correctly 🙂
P.s: Glad to see this page still alive in 2024 😀
A bit unrelated, but just thought I’d share with my fellow salvagers.
You may want to add a DC fan inside your sub if you plan to stuff a new amp in there. This was what was recommended whilst I researched fixing my klipsch 2.1. These PC setups simply don’t push enough air to cool the electronics inside for most of its life. Think when they’re idling. Think when you have to turn down your bass because of neighbors/roommates. Think when you’re using headphones. The fan will get that heat into the air where it will be more easily pulled out by the speaker. I hooked up a 5v power adapter to a 12v fan to my klipsch.
I use a power converter to connect my Mako 110v. In my house the electrical system is 220v. But I thought of replacing Mako’s internal transformer 110 with 220, with the same outputs. Does anyone know how to do this?
Thiago,
I don’t think you can do that. The Mako doesn’t have a transformer, the power supply is a “switched” power supply, so it handles the voltage down regulation using electronics. It’s probably just differently wired when set to 110V. (Actually, it’s unusual to have a switched power supply not automatically handling both 110 and 220, but this one clearly can’t.)
The transformer you see inside the Mako is a high frequency transformer converting from lower to higher voltage, a step up converter, not a transformer for mains voltage.
Martin, thanks.
Story Time:
A Long time ago I got a broken razer Mako from my older brother -who had left it to rot :'(- with the firm intention of fixing it.
I had low hopes but when i found your post from 2015 i followed it to the letter, it was not simple (removing the caps from the board is so stressful lol) & buying caps and stuff from the internet felt like i knew nothing about electronics anymore but boy when it worked again, i was thrilled.
Thanks for that.
Now comes November 2020 & my mako is going blinky blinky again, I’m here listening at the “hiss” sound you must know too and thinking to myself:
“Impossible that I’d find yet another tutorial for this new issue after I already fixed prob the same thing back in 2017” but HERE YOU ARE MY MAN !!!
With yet another voodoo magic tutorial, easy and precise, so I followed your instructions this morning, AGAIN but with more confidence, and like you said, I replaced that C122 cap with a spare
680 µF/16V (don’t ask me why this one, i only had three spares and nothing seemed better…) and BOOM, the speakers work again.
Wow dude, you rock !
Small question: Should i buy a different capacitor to replace the new (680 µF/16V) one ?
Replace it with a 470 µF/35V like you would make it “better” ?
I’m not expert in electronics and am French so sorry for any english mistakes.
I got no words to express my gratitude, two times now you saved my gear !
How can I paypal you a coffee ? Lol
Best,
Alex
Alex,
Thanks for telling your story, that’s more than enough reward for me. Makes me happy.
About the capacitor: yes, I do think you better replace it again. Not so much for the high capacitance, but the 16V tolerance level is too low. It will fail again, and probably soon. Best would be 35V and at least 330 µF.
Thank you for your reply !
I work with these speakers for music production on a daily basis and you truly are a generous person for taking the time to explain to us noobs how to repair them.
Not throwing away and buying but recycling and repairing, better for the planet, my wallet and my ears lol.
I’ll get fresh new caps and spares then ill be ready for your 2023 mako article haha
Thanks you for everything Martin
I hope you all the best for 2021
Cheers,
Alex,
It wouldn’t surprise me if there will indeed be a 2023 article… let’s see for how long we can keep patching our Makos up.
All the best to all of you, too.
where would I start if there’s no sound and control puck does not light up?
I replaced the capacitor pointed out by the red arrow with a 25v 470uF. The power switch works fine and the 120v shows up on the board. Got accidentally shocked by the board when messing with it. None of the capacitors are swollen. Turning it on and leaving it for 15-30min made some caps feel slightly warm but not hot to touch. Tried reflowing/resoldering many of the connections on the power side of the board.
I got this from someone who was going to throw it out. Thought it would’ve been a waste. Also thought it was going to be a capacitor fix or loose connection since there was no sign of life.
Thanks!
The power only comes on fully if everything is connected, including the puck and the satellite speakers. As you noticed (!), the board is very dangerous to touch while live; you’re lucky you have only 120V. See my remarks about the isolation transformer in the article, btw.
If that doesn’t show any easy to find hot capacitors (after unplugging!), then it’s going to be harder. Especially since we have no schematics. I have no easy answers for you, I’m afraid.
When I took my Makos in for repair a few years ago, the guy who did it said he replaced several of the capacitors which included C125. It looks like he used Rubycon caps, which I understand are good quality. The speakers are now hissing again. When I took the subwoofer apart I noticed the area around C125 is quite hot to the touch but there’s no bulging or visible signs that something is broken.
I really don’t want to spend $200 to get them repaired again. Fair to say C125 needs to be replaced again?
If the C125 capacitor itself is hot, it’s bad. It will only bulge after it’s been hot for a while and dried out internally. I think the original is 47µF/25V and maybe the repairman put in the same rating, which seems to be underdimensioned, which is why it fails. If you replace it, try to get a higher voltage, like 35 or 50V.
Rubycon is good but if it’s old Rubycon that’s been sitting on a shelf for years, then you’ll still run into problems I’ve heard.
Just wanted to let you know and future readers that I fixed the speaker. Turned out to be the control pod cable. Accidentally found the problem when checking if the vga connector had bad solder joints. The cable was bad close to the connector. Turned to be one wire. I spliced the entire cable. In retrospec, it would’ve been better to carefully slice the insulation and see if any wires were broken with a pull.
I now realized that I never tested the system with it “on” because the control pod was never responsive or had power. The system needs to be turned on with the control pod. My cap temp tests were meaningless. haha. I hope this helps someone. If control pod has no power at all, bend/wiggle the cable in all directions at where it connects to the sub to see if there’s any sign of life.
Good find, James! Yes, that explains it. Not everything is caused by the caps… Thanks for letting us know.
I assume you’re referring to situations where the system won’t power on at all, right? I’m dealing with buzzing/hissing and when I took it apart last week I noticed the area around C125 was very warm/hot. Hopefully replacing the caps does the trick again!
yes I was referring to situations where the control pod doesn’t light up so you can’t “turn on” the system.
You should replace C125 again if that was what fixed the problem and the cap now feels hot. Again, name brand caps sitting on a shelf for years can go bad. The electrolyte inside will dry. Caps are preserved in circuits when power flows through it.
Martin, Thanks again for starting this page.
Just replaced C125 and it didn’t fix my buzzing/hissing problem. Will have to look at the other caps in the area…
Hi nicholas, Thankyou very very much, im follow your trick by using an amplifier and my mako come back to life again!!!!. for the quality of sound i think it has more bass than the original. but overall im happy with this speaker. again thankyou verymuch!!!
The Story, my mako worked from 2012 to 2020, in 2020 i had a problem with death click and i followed martin trick by replacing the c125 capacitor and it worked thank you martin, 1 year later the death click problem appeared again and plus the control pod didn’t turn on, I tried to follow every post here and in the comments by replacing all the capacitors near the c125 area but that didn’t work. i tried to turn on the speaker for 2 hours but i don’t feel any heat in any of the capacitors. in the end I gave up on my mako. In 2022 I still love my Mako speaker and try to find a way to fix it, after seeing Nicholas’s comment and trick, my speakers work again but the difference is I don’t throw away the mainboard because I feel what if one day I want to try to replace all the capacitors on the mainboard can still work again. anw for someone if you have a problem with control pod didn’t turn on. try trick from nicholas by using an amplifer my it work! thank you
Glad to be of help Fathir 🙂
Thank you so much buddy, mine was not making any sound beside hiss, and control pod was missing some of the volume bars, replacing C122 fixed all problems, appreciate your findings!
I very much appreciate you publishing this.
It helped me fix my set twice.
I would be nice if the table was updated to show on which capacitors goes where like C125 being 100µF 25V.
I’m working on decoding the mako control pod signals, want to control volume via my TV.
I have thus far found that volume and channels (inc. bass) control is communicated over a I2C bus at 3V3.
What is exactly communicated I have find out.
This is something I do in my spare time.
So don’t expect quick progress.
As you say, it would be nice if I had a full table of which capacitors had what values, but I don’t have that information.
About the control signals: it would be very nice if you could figure it out. I’m sure a lot of people would like that.
Yeah I probably fried the control board.
Whilst trying to find the data lines.
Hi and a big thank you for this page.
I recently found this set all complete in the garbage collector where I work. It has worked wonderfully a few days then it turned off suddenly.
No click of death, but when I pressed the pod, the volume lines started to go up then down instantly, with a small pop coming from the speakers, and it stayed turned off.
I bought every cap listed here, and it turned out that it was the big 22uF 400V that was the culprit. Unfortunately the one I got was too big to put the PCB back so I had to cut the inner plastic with a Dremel to make some room for it.
Now I’ve got a fully working set, and a handful of Panasonic caps in case it decides to “click of death” me 🙂
Glad to be of help Boomchil and happy new year (2023) everyone!
This page will live forever XD
Well, that depends on how long I live. But so far, it’s looking good.
Well.. we can also pay to keep this website alive on the server 😛
I’ll put a provision in my testament… 🙂
I cannot thank you enough!! I replaced the capacitors c121, c122, c125 and c126 and my system works again. It worked fine before but has been sitting for many years and it had the blinking blue light and no signs of life. Works like new now!!
Blessings to you!
Hello!
I fixed my mako years ago with the popping issue using your post. Thank you for keeing it alive for all these years! Im sure everyone who has used this has found the value in it.
My mako has just died and I am very sad. I plugged it into a Macbook Pro docking station and tried to turn it on (it was off but the pod was blue and had trickle power) and it instantly lost power to the control pod. I unplugged everything waited a while and connected it up again just to make sure its completely dead… it is.. No power to the puck.
I am planning to open it up and check over the board. But also wanted to see if anyone had any issues similar to this… or if you know where I should start… based on the cause.
Thanks in advance!
Hi, please check the capacitors, most likely what it’s broken it’s inside the subwoofer unit, not on the remote puck. From what I remember, I fixed mine with the pooping issue, than I had another issue, can’t remember exactly if it was like yours, but was some capacitors on the PCB. Watch out, some capacitors still holds power, even unplugged… I got shorted a few times.
I am glad my unit still works even today!
I even got a friend into buying one, he got it for about $100. That’s a steal from what it sounds like.
Again, check the capacitors. Maybe someone else around here knows better and can help you better, thanks to this community for keeping those speakers alive!
For me it was the cable to the control pod. Give the cable a wiggle where there’s a tight bend. It should intermittently restore power. That’s were you want to cut and splice the cable. Warning that they are small cables and there are many of them. Helping hands helps greatly.
Thanks for the quick reply.
I did see your earlier comments about that resolving your issue… I tried it with no luck. No signs of power at all no matter how/where I bend/twist the cable… the control pad has no lights at all. I also checked the caps for any swollen/bulging and everything looks good.
Just tested the fuse and there is no continuity. I will replace the fuse and see if anything changes.
I replaced the fuse and capacitor. Did not work. Fused instantly blew again and the capacitor is shorted to ground. Used thermal gun and noticed 54 degrees celsius coming from the JNR15S050M Termistor…. its the green circle next to the 400v 22uf capacitor. Cant seem to find anywhere to buy this.
At this point im stuck. any advice would be awesome.
Thanks
Find out the rating/spec of the thermistor that you’re trying to replace then find an equivalent. Out of production parts is a common issue. My electronic skills are hobby level. So I’ll leave those wiser than me to get into the details. 😉
Replaced all the caps in this thread. Issue persists. Fuse blows immediately when powering up.
Going to gut it and use the 2.1 amplifier to save the speakers. Will update how it goes.
I would get something from Alliexpress, a good one must be @ $100. Get one with Bluetooth. You should also be able to find a rotary dial for the volume remote. Please let us posted and good luck!
Yes I ordered one from aliexpress.
I took apart the 2 speakers and now have questions if anyone can help.
Inside the speaker is the mid speaker and a tweeter. They are both connected to a board that outputs with the ethernet style… Would I need to get a crossover to replace that board to get the correct frequency to the tweeters.
I know you can wire tweeters directly to speakers but can affect the sound or blow the tweeters.
Good question about tweeters. Generally the output of an amp should be matched to the speaker.
Do the tweeters have any info on them?
Ohm and watts?
And what is the spec of your amp?
It’s either have separate wiring out of the amp for mids and tweeters, or if the amp comes without, just use crossovers, Alliexpress has it all, check the Ω (ohm’s) on the speakers, make sure you get the right one.
Or just get the crossover separately, they are cheap on Alliexpress, if you are a bit technical, you should be able to fit everything in the subwoofer and use the existing wiring, a little challenging, but not impossible.
I cant seem to find a crossover that will work. The tweeter frequency goes to 20,000Hz but unsure what frequency the mids go to.
On the tweeter it says
E15-00235-01
Power: 20 Watt
Imp: 4 ohm
823002
Mid says:
Wave9
FR0304K
e15-00223-01
8 Ohms 12W
8E26A
I dont know much about audio. If you are able to link me to a crossover that would work. I would be greatly appreciated. Thanks
Im back.
I found the most compact crossovers available on AliExpress that perfectly fit into the speakers. After installing them in both speakers, I’m happy to say that the sound quality is close to original! Experimenting by directly connecting the tweeter and mid to the amplifier without a crossover yielded subpar audio… I am nowhere near an audiophile but just didn’t sound good
To help others in the future I recorded the process of disassembling the satellite speaker and wiring up the crossover. I’m considering uploading a youtube video in-case anyone needs help figuring out how to do this.
Yes, please do. And post the link here if/when you do. Thx!
My razer mako wont turn on. No lights in control pod. What might me the issue? Im still using them 🙂
I’m pretty sure there is a fuse on the circuit board, but I can’t remember exactly where. A glass tube type of fuse. Check that. Else you have to (or get someone to) check out the voltage coming into the speakers with a multimeter to see where the circuit is broken. As always, be very careful not to electrocute yourself, any part of the board can expose dangerous voltages even if it seems dead.