As I already mentioned, the Mac Pro 2008 (10.10.5) I’m running the Retrospect server on, dropped its network connection for the first time in nine years (that I’m aware of) after installing Retrospect. Since then, it’s happened more than ten times, three times just during the last 24 hours.
Category: Networks
Retrospect setup, tips and tricks
While setting up Retrospect, I ran into a number of problems, most of which I think I solved. I’m just noting some of them here, so I can find them again. Or so you can find them, perhaps. I’ll add to this post as I encounter more oddities.
Is there life after Crashplan?

Now that Crashplan for home is gone, or at least not long for this world, a lot of people will need to find another way of backing up their stuff. It’s tempting to get angry, and there are reasons to be, but in the end you have to forget about all that and move on. Even though you may have months, or even a year, before Crashplan stops working, there is another reason you have to get something up right now, namely file histories.
Static route on OSX
I have this 2008 Mac Pro running 10.10 connected to two networks, one from each interface. Now, number 1 is connected to a slower WAN, but is the route I need to take to cross a VPN tunnel to a customer site. Number 2 should be used for everything else.
Let’s encrypt
I got myself another hoster. Bluehost has gotten really awful, had to move. Right now, one of my mail accounts can’t be reached from the place where I work, so I have to VPN to my home net to check mail(*). They’ve also changed the mail management so I can no longer see how much data is in mailboxes, making moving them iffy (I don’t know if my users have moved out the email or not). And, obviously, I’m not going to go try to make tech support at Bluehost help me.
Oh, just for giggles, not a single way of trying to backup stuff from Bluehost works, neither for small nor for large backups. It’s all borked and tech support won’t even try to do something about it. The workaround is to export the MySQL databases manually, to export WordPress content through the WP dashboard, and to tar the site folders and FTP them out.
I’ve been setting up stuff on Dreamhost now for a week or so. It’s pretty enjoyable; everything seems to work. Dreamhost also has a working implementation of Let’s Encrypt which I’ve activated on everything in sight. So far on this domain, on vard-it.se, and on iota.pro, with redirects to https from http. You’ll notice that some pages still have mixed content, causing security warnings, but that’s because I can’t get WordPress to use https for all images automatically, and I don’t find it worth the effort to go through all old posts to update them all.
(*) Update: turns out the email thing was my own fault. I noticed I had used a server url on my laptop that I had changed in the meanwhile. That doesn’t change my distaste for Bluehost, though.
Our specialist who works on the trace rout department
So from last night sometime, I couldn’t get at my email server. Nobody here could. From another net it worked fine. So I figure I need to talk to Bluehost.com, the hoster. I had a chat earlier today that I had to cut short due to other things. And due to me being close to completely losing it. So this is act II. The only thing that kept me sane during this hour-long confrontation with inanity was the thought of publishing it here. So here you are. Bluehost support in all its glory.
Continue reading “Our specialist who works on the trace rout department”
Pure speculation: MS servers for OSX?
Why Microsoft CEO Satya Nadella Loves What Steve Ballmer Once Despised | WIRED
(Via KimN.)
Now, what if MS became the server supplier for Apple’s devices (OSX and iOS)? Apple doesn’t seem to want to be in that business, and IBM is doing something else.
Netbooting on OSX SL Server
Once I got tftp working on IPv4, I still couldn’t get the Macbook client to download the boot or image files. Wireshark showed that the client didn’t get any file when it sent “acknowledge data block 0”. Nothing. So I installed tftp-hpa from Macports, hoping that would solve my problem, which it didn’t. But a few tips on that:
Install tftp-hpa using the “server” variant like so:
sudo port install tftp-hpa +server
Then go into the preference file (which isn’t in the same place as most plist files):
sudo pico /Library/LaunchDaemons/org.macports.tftpd.plist
…and remove the “-s” command line parameter, while changing the path to “/private/tftpboot/”. The “-s” parameter forced a chroot which won’t allow tftp to follow symlinks outside the given path, making netbooting impossible.
Then, and this is the crucial step, change the block size to max 512 by adding the “-B” option with the value “512”. What seemed to be happening in my installation is that the client requested a block size of 8192, the server approved it, and things just stopped working. Probably something to do with the switches I have, but crimping it to 512 fixed the problem. Of course, if you’re doing netbooting on a regular basis, or run diskless workstations, 512 may be intolerably slow, so then it could be worth experimenting with higher values.
I ended up with a plist file for tftp-hpa looking like this:
<?xml version='1.0' encoding='UTF-8'?>
<!DOCTYPE plist PUBLIC "-//Apple Computer//DTD PLIST 1.0//EN"
"http://www.apple.com/DTDs/PropertyList-1.0.dtd" >
<plist version='1.0'>
<dict>
<key>Label</key><string>org.macports.tftpd</string>
<key>ProgramArguments</key>
<array>
        <string>/opt/local/bin/daemondo</string>
        <string>--label=tftpd</string>
        <string>--start-cmd</string>
        <string>/opt/local/sbin/tftpd</string>
        <string>-B</string>
        <string>512</string>
        <string>-L</string>
        <string>/private/tftpboot/</string>
        <string>;</string>
        <string>--pid=exec</string>
</array>
<key>Debug</key><false/>
<key>Disabled</key><true/>
<key>OnDemand</key><false/>
</dict>
</plist>
After modifying the file, stop and restart tftp-hpa by:
sudo launchctl unload /Library/LaunchDaemons/org.macports.tftpd.plist
sudo launchctl load -F /Library/LaunchDaemons/org.macports.tftpd.plist
It’s entirely possible I never needed to switch tftp servers from the default to tftp-hpa, but now I did, I don’t know if I’ve got the courage to switch back to try the original. Checking the man pages for the original tftpd server, I can find no setting for max block-size, so maybe tftp-hpa is necessary after all, just to be able to crimp the blocks enough.
OSX, FreeRadius, Netscreen, and me
Oh, wow, this was crazy. What I needed to get done is to have a Juniper SSG-5 firewall (which runs Netscreen OS 6.2) authenticate users from the FreeRadius server that runs by default in OSX Snow Leopard server (10.6.3). And I needed the SSG-5 to differentiate depending on groups on Open Directory on the OSX. But, man, is this poorly documented… the only thing you find in the OSX documentation is how to get an accesspoint to allow users in. That’s it. Not good enough.
You can click any of the images in this post to see the screenshots full size
First, a list of documents you may need, or I may need later and don’t want to lose:
dictionary.freeradius.internal – an Apple document listing the attributes passed to FreeRadius.
A usegroup message with some useful examples
Using OSX Radius with third party devices – has some info on hunt groups
Make sure radius is running
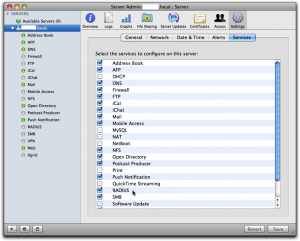
Via Server Admin, make sure Radius is selected in the services tab so it occurs in your list of services in the left pane.
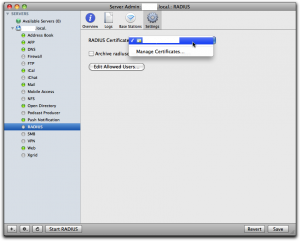
Then select “Radius” in the left panel, select “Settings” and click the dropdown for “RADIUS Certificate”. There you should either select a cert you already have installed on the server, or else select “Manage Certificates…” to go and create one. I already had one, and I had it created by CAcert, a free service for certificates of all kinds.
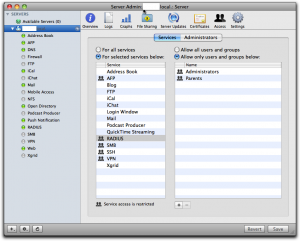
When you’ve got the cert sorted out, click the button “Edit Allowed Users…” and you’ll get to this screen:
See to it that you’ve selected “For selected services below:” in the left half of the right pane and that “RADIUS” is selected in the list. Then use the plus sign below right to add all groups you want to manage through Radius. Don’t forget to click the “Save” button when you’re done.
If you have any regular wireless access points you want to add, you can do that through the Server Admin as well, but you can’t add any other devices this way.
Just to see if things are more or less right, try to start the Radius server and then check the logs. You can do that by selecting RADIUS in the left panel, click the “Logs” tab on top and then play with the “Start RADIUS” and “Stop RADIUS” button at the bottom of the screen:
If it complains about the lack of any clients, don’t bother. Just leave it off, since we’ll add clients through the command line shortly.
Once you’ve played with this for a while and are satisfied that it is not too bad, you can leave the Radius server off. We’ll start it from the command line later.
It’s important to understand that all the groups you select here, and only those groups, are copied over to the user database in the Radius server. Any users that are not in one of these groups cannot ever be enabled through Radius; they’re simply not seen by the Radius server.
Also important to understand is the fact that this is as far as Apple goes in its GUI implementation of Radius. That is, any user that is enabled for Radius this way can log in to any Radius enabled wireless access points on your net. They don’t make any distinction according to user or group as to what you can do, nor do they implement anything else but wireless access points. This means that for more sophisticated usage, you have to proceed on your own, largely through the command line and config files.
Add clients to radius
A “client” is a piece of equipment that will ask the radius server to authenticate users, so clients are accesspoints, firewalls, maybe switches and routers. Each of these pieces of equipment that you want to have call the radius server needs to be configured in the server with its IP number and a shared secret (password). This shared secred is the same on both sides, so each piece has its secret shared with the radius server, but each pairing has another shared secret. If you want to add just Apple supported wireless access points, you can do that through Server Admin, but for everything else you have to do it as follows.
To add a client to the radius server, you use the radiusconfig utility on the OSX server:
sudo radiusconfig -addclient 172.16.200.241 ssg5 firewall
After you enter this command, radiusconfig will ask you for the shared secret. Remember it, because this is the same secret we will need to enter in the SSG-5 later. A side note: the last parameter is the type and I gave it as “firewall”. As far as I can see, it’s purely descriptive and you can call it “bigbrownbear” for all the difference it makes.
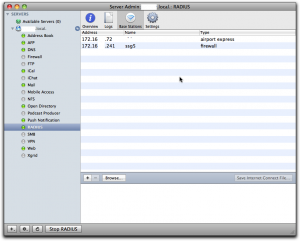
If you check the list of “Base Stations” in Server Admin, you’ll should see this client in the list, at least if Radius is running:
Add the DEFAULT entries to the users file
Even though Radius users are held in an sql-lite database under OSX, the users file still does exist and is read. In this file, we can add in rules that will be processed for any user that is accepted by Radius, so we can add on values to be returned to the Radius client (in our case, the firewall). In the users file, you also have access to some information from Open Directory on OSX, so the users file is the place where information is transformed from OSX Open Directory to Radius clients. This is where the magic happens. We write all our rules for the magic user “DEFAULT”, which matches any user accepted by Radius. More than one rule may match a real user, and all of the matching rules will be applied.
Open the “/etc/raddb/users” file on the server with pico as root:
sudo pico /etc/raddb/users
In that file, towards the end, in among the other “DEFAULT” rules, add this one:
DEFAULT   Group-Name == "Parents"
     NS-User-Group = "majors"
What this rule does is that it checks if the user under OSX in open directory belongs to a group called “Parents” and if so it sends the NS-User-Group attribute with the value “majors” to the client, in this case our firewall. We’ll add another rule:
DEFAULT   Group-Name == "Children"
     NS-User-Group = "kids"
Note: I made the group names very different on the OSX Open Directory side (“Parents” and “Children”) and on the Radius client side (“majors” and “kids”) just to make it extra clear which group is which.
Set up authentication server on the SSG-5
Now we have to tell the SSG-5 how to find and talk to the Radius server. Log in on the SSG-5, go to “Configuration” – “Auth” – “Auth Servers” and click “New”.
Give the OSX Server a name, any name. It’s used to refer to this server when you create policies in the SSG-5 later. Enter the IP number, and select the “Auth” under “Account type”.
In the lower part, select “Radius” radio button, set the “RADIUS Port” to 1812, which is the default on the OSX FreeRadius server. Set the “RADIUS Accounting Port” to 1813, even though we don’t use accounting in this example. In the field “Shared Secret” you have to enter the same shared secret you entered while defining the SSG-5 client on the OSX Server using radiusconfig (see above). Leave the other fields unchanged and click “Save” at the bottom of the screen.
Add external groups to the SSG-5
We configured the OSX FreeRadius, via the DEFAULTS in the users file, to return groups “majors” and “kids” depending on who is logging on. Now we have to set up these groups on the SSG-5 as well. Go to “Objects” – “Users” – “External Groups” and click “New”.
In “Group Name”, write “majors”, then select the “Auth” checkbox for “Group Type”. Click the Ok button, then repeat the process for the “kids” group.
Now we do a policy
Now we finally arrive at the writing of policies that make use of the groups. In this example, I’m going to limit access to the dn.se site, Sweden’s largest newspaper, and I’ll only make it accessible to OSX users that belong to the “Parents” group on OSX. To do this, I’ll first have to make a policy that by default disallows everyone from accessing dn.se, then add a policy that allow members of the external group “majors” to access it anyway (remember that the OSX group “Parents” is translated to the group “majors” in the users file, so the external group is “majors” on the SSG-5). Let’s first do the policy that disallows all access to dn.se for everyone.
Go to “Policy” – “Policies”.
Select from “Trust” in upper left, to “Untrust” in upper right dropbox, then click “New”.
Use dig or nslookup from the command line to find the IP number for dn.se. As of the writing of this post, it was a single IP number: 62.119.189.4.
When the form opens, give the policy a reasonable name like “No DN”, leave the source address set to “Any”, but change the destination address to “62.119.189.4” and put in “32” in the mask field. The “Action” dropdown should be set to “Reject” and you can leave everything else as it was and click “Ok”.
Use the move tools in the policy list (far right) to move this policy to the top of the list. The policies are processed from top to bottom, so we want to make sure the rejection happens before any other policy may allow the connection.
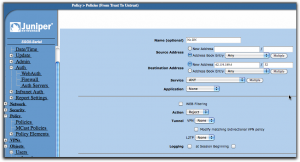
Add another policy from “Trust” to “Untrust”, then fill it in as in the following screen:
Give it another name, in this case “Allow DN”. You can now select the destination address from the address book entry dropbox so you don’t have to type it in, it’s just a convenience since the SSG-5 now knows about this IP from the previous policy. The “Action” dropbox should now be set to “Permit”.
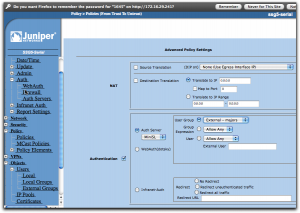
If this was all we did, we just simply nullified the previous policy, at least if we put this one above it in the policy list, and that would be pointless. Instead, click on the “Advanced” button at the bottom of the screen.
Now everything comes together. Enable “Authentication” by selecting that checkbox, then select “Auth Server” using the radio buttons. In the dropbox, select the auth server you created earlier, the MiniSL. Slightly to the right, you can select who is going to be authenticated and here you select “User Group”, then “External – majors”. If this selection isn’t available, check that you did define that external group as I described a bit earlier.
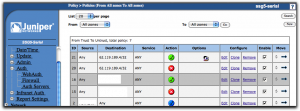
With all this done, save. In the list of policies, you should put this new policy at the top using the move tools in the last column so it ends up above the first policy we did that is set to reject connections to dn.se for everyone. The result should look like this:
Testing it all
If you started the Radius server through Server Admin, go there and stop it first. Log in to the OSX server and open a terminal shell. Start the Radius server in debug mode from here by:
sudo radiusd -X
This should get your Radius server running and you’ll see how it handles requests. Now go to a browser on any other machine on the local net and try to open dn.se. You should get a login dialog from the browser itself and if you provide a username and password from someone who is defined in the OSX Workgroup manager, is in the “Parents” group, then you should get access, else not.
I hope it works for you. If not, explore the raclient tool as well, since it’s very useful for finding configuration errors. Once it all works, stop the Radius server on the command line and go start it from Server Admin instead, so it runs as it normally would.
A little remark: if you change settings in the users file, you have to stop and start the Radius server again each time, else it won’t see the changes.
I’m planning to do a post on hunt groups as well, but I haven’t done them yet, so it could be a while.
Additional notes
You will find files with all the predefined attributes in the folder /usr/share/freeradius. Each type of equipment has its own file. The attribute names I used above come from the file “dictionary.netscreen”.

